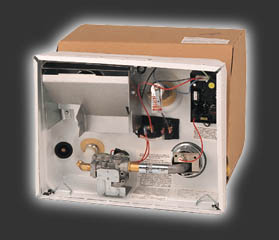
WHAT ABOUT WATER HEATERS
by Gary Motley
Master Certified RV Technician
I am often ask to hold "Service Seminars" by camping clubs, campgrounds, etc. While going through my prepared program many questions come from the floor. These questions are always enjoyable and informative to the participants because they are of significance to at least one person in the crowd. One of the major subjects of these questions is often the water heater. It is from this observation I have chosen to write this article on water heaters in a RV.
There are two manufactures of water heaters in the RV industry today:

Atwood (or Atwood Bowen for the real old timers)

And Suburban (formerly Mor-Flo and American Standard).
Many of the questions are specific to one brand only. There are some differences between the two. I will try in this article to address any differences that would be of consequence to the average RV'er in normal use and operation. It is not my intent to get into specific detailed technical troubleshooting and repair, but to address some common complaints and questions that the average RV'er can easily address.
Rotten egg smell in the hot water.
One of the fun things about RV repair is it is very common to find varying opinions about solutions and causes for the same basic problem. I have found three different techniques to this problem. The cause always seems to be pretty much the same however.
Cause: Sufficient amounts of sulfur in the water to produce an odor. This is caused by the electro-galvanic action of either the special 15% thickness of the type 7072 aluminum (pure aluminum and zinc) that is fused to the inside of Atwood tanks since 1988 or the anode rod in the Suburban. Bacteria in either brand can also cause it.
Step 1 : Turnoff the water heater and let water cool if need be.
Step 2 : Drain and flush the tank. By flush I mean let fresh water run through the tank quite awhile and get out all the sediment that can settle in the bottom of the tank. The agitation action of the water coming into the tank should help unsettle and flush the sediment. Compressed air can also agitate the sediment or you can use a bent stiff wire or brush and go in through the drain hole to stir things up. If you do this be careful not to damage the threads. This is also a "tool" available in most RV stores that hooks on the end of a water hose and is specifically designed for this purpose. The primary objective here is to get the sediment out. I might also advise to be certain the water you use to flush does not have a sulfur odor. Keep the drain hole clear as the sediment can stop it up.
Step 3 : (optional): Remember the varying opinions? Here is one. Fill the tank with 2 parts distilled vinegar to 1 part water and let set at least 2 hours. That is a lot of vinegar! I checked to be certain my manual did not have a misprint and that is the correct ratio. Let it sit for a couple of hours and rinse with fresh water. To fill the hot water tank only you must go through the T&P valve (the valve on the top of the outside of the tank with a lever and metal tag on it.) Screw a male fitting into it and let gravity feed the solution in through a funnel and flexible hose (open a hot water faucet to let air escape). You can also go through the drain valve or anode rod opening using the same procedure. You can open the T&P valve to let air escape. Be sure to hold funnel/hose high. The third way is to pump it through the fresh water system. This will also pump the vinegar water into most of the rest of the system. You will need to flush real good before proceeding to the next step.
Step 4 : (optional): Add about 4 teaspoons of household detergent for every 10 gallons of water into the fresh water tank. If you will add a little detergent then water then detergent then water, and so on this will help mix the solution. Run this solution through your whole water system (all faucets, valves, and toilet). Use your water pump and continue putting in water and pump through until the detergent is gone. Be certain to remove faucet aerators and shower heads during this procedure. Clean and reinstall them before the next step.
Step 5 : (recommended option): Do the same as step 3 using common household bleach at 5-6 ounces (2/3 to 3/4 cup) per 10 gallons of water. You might let this set in the system for a couple ours to a few days. Then flush out till chlorine smell is gone. Some people advise this step may need to be repeated several times.
As you can easily see, Step 4 & 5 also help freshen your whole system.
Step 6 : When you are convinced you have all the vinegar, detergent, and bleach out, close the system and refill the water heater and the system. To fill the water heater correctly you should follow the instruction in the next section.
![]() T&P Valve
T&P Valve
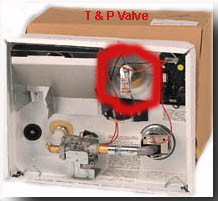
The T&P valve is a temperature and pressure valve. It is a safety device designed to release when the water temperature reaches 210 degrees or the pressure within the tank reaches 124 to 150 PSI. weeping or dripping of this valve while the water heater is heating does to mean it is defective. This is the normal expansion as the water is heated in the small closed water system of a RV. Your water heater tank is designed with an internal air gap at the top of the tank to reduce the possibility of weeping and dropping. Over time the heating water will absorbed this air. To replace this air which will correct a weeping T&P valve the steps are:
Step 1 : Turn off the water heater and let water cool.
Step 2 : Turn off the incoming water supply or water pump (first make certain the system is full, up to pressure and the water heater is full).
Step 3 : Open a faucet in the coach to release the pressure.
Step 4 : Pull the handle of the T&P valve and allow water to flow until is stops.
Step 5 : Snap the t&P valve shut, close the faucet and turn the water back on.
I might add it is not a bad idea to open the t&P valve occasionally just to make certain it has not become seized up with lime deposits. The T&P valve is a safety device but will not work correctly if seized up.
Sooting
It is not uncommon to start the heater and never actually check the outside of the coach where the water heater is. You should occasionally check the exhaust of your water heater for black soot. This can be caused by several things such as LP gas pressure, a dirty orifice, a dirty burner of flue tube, a misaligned burner or burner flame spreader, bad air adjustment or an obstructed exhaust grill. You will need to use your own judgment as to whether to seek professional assistance at this point. Most people do not have the proper tools to address many of these malfunctions. Periodic servicing of the water heater will help insure the most efficent performance.
My water heater won't light

I have fixed many propane appliances by simply turning on the valve or by filling the propane container. The propane detector needing to be reset is also a common culprit. Often on the regular thermostat models you only need to increase the temperature setting or turn the control knob from pilot to on. another common cause (DSI models) is a fuse or low battery voltage.
Often when the light on a DSI switch comes on but there is no attempt for ignition the problem is a bad connection at the PC board. This is more frequent on the Atwood models because the board and plug are only partially shielded from the weather. Often this can be corrected by simply pulling the plug off where it attaches to the PC board and reinstalling it. On some Atwood models this can be pretty tricky because of the position of the T&P valve. Good luck! This quickly cleans a bad connection. Lowering the cover accesses the plug on an Atwood. It will have four small wires going into tit and will be readily visible. It is about 1 1/4" long and 1/4" wide. On the Suburban model it is on the backside and is accessed generally through a cabinet door or inspection plate.. Suburban has a cover over it. Your must remove this cover to access. Some Suburbans put the PC board away from the back of the water heater. You will need to follow out the wires to find it (generally pretty close to the water heater). I often must re-secure the remote PC board as many times the factory either does not secure it or uses tape that easily comes loose. When working at the back of the Suburban be certain to turn off the 110V circuit breaker if the unit has a 120 AC heating element. I believe the reason for this is obvious.
Suburbans have a high limit switch (ECO) that can blow if things get too hot. Older models have this on the back and it is a little red button. Simply push to reset. Newer Suburbans have it behind the outside cover for easier access. It is a little black rubber push button. Generally this only happens when the thermostat has let the water get too hot. Your should seek professional help when this happens. The ECO on an Atwood DSI is an automatic reset. Pilot models have an ECO built into the valve. If this ever blows the whole valve must be replaced.
DSI models have a switch inside the coach with a red ignition light. Anytime this light is on it means the switch is on and the burner should be burning but it is not. The PC board has most likely gone into lock out. Turn the switch off, and wait about 30 seconds, and turn it back on. If the burner then does not light try this 2 or 3 times. Still no light, go to the above steps for propane, voltage, plug pulling, and ECO switch. Beyond this you must seek professional help.
My Water Heater Won't Stay Lit.
On DSI models, This is generally one of two problems:
1. The electrode is not getting enough heat to create a signal to send to the ignition board to tell it to keep the valve open.
2. The board is not accepting the signal. This generally means it must be replaced.
On Pilot models, the thermocouple is either not good enough into the flame to create the correct electrical current or the thermocouple is defective. The thermocouple is the metal piece about 2 inches long that the pilot flame is supposed to engulf. The other problem could be the ECO on the valve has blown and the whole valve must be replaced. There are tests that can be done on these. A qualified Technician would need to do them.
Other items of interest and /or importance.
1. Never turn your water heater onto electric with no water in the tank.
2. Electric (120 AC) side of water heaters also have a high limit or ECO. Some inside the access door, some at the rear.
3. Both major manufactures have a service bulletin out warning against aftermarket 120 AC add on heating elements.
4. Atwood now has an aftermarket adjustable thermostat for the DSI model.
5. Suburbans have an anode rod to equalize aggressive water action providing Cathode protection for the glass lined tank. This is a very important factor in the life of your tank. The anode rod should be removed periodically for inspection. I have been asked how often. The answer is based upon use. Full timers should inspect it monthly. Normal part time use check quarterly. Your water heater manual you got with your coach should have more information on this, as well as, much other information on your water heater and other maintenance tips.
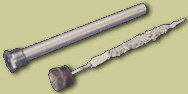
A good Suburban anode rod and a worn out anode rod
I have tried in this article to address many of the items I see in my shop that can often be repaired by the customer, or some preventative maintenance would have helped. I did not mention winterizing because most people have easy access to winterizing information. You should also be aware of your abilities with your knowledge and tools. If you feel it necessary to refer your coach to a trained professional please do so. This article is not intended to take the place of professional detailed technical Training.
Back to Motley RV Repair Home Page Back to Motley RV Repair RV Care/ Use Articles